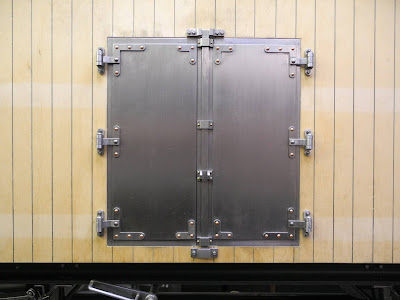
The side doors are made of steel. These are relatively low, because under the roof of the real wagon the trays for ice were located. The two 'fleugeltüren' ( hinged doors) are locked in the middle with a sliding strip that locks at the top, bottom and middle simultaneously.
It took me some time to figure out how this system worked; especially the top of the locking mechanism. This was not to see on photos or the H0 or Gauge 1 model. But a visit this summer to the French railway museum in Mulhouse (Cité du Train) gave the solution.
Although a different wagon, they have a refrigerated beer wagon (Meteor) which has a similar locking mechanism.
The Meteor Beer wagon.
A sliding strip along the door, that can be moved up and down by a handle.
Top clamp.
A T-end that catches into the top clamp, when moved downwards.
The shaper put to work to make all the small profiles for the doors.
The base for the handle, that will operate the door strip.
Cutting to length in the milling machine
The doors are made of sheets of 1,5 mm steel plate, glued togehter.
The locking strip on the right hand door. This door is wider than the left door.
The locking strip is 6 x 2 mm and slides under the base of the grip
Drilled, tapped (M3) and riveted to the door; the base of the door handle
Testing the assembly. Some adjustments to the door and door frame had to be made (fillling) to make a nice fit possible.
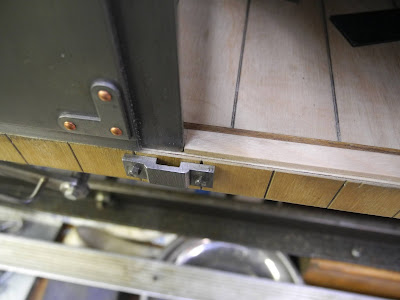
Support bracket for the sliding strip.
Left door done
And right hand door done. This two times, for the doors on the other side of the wagon.
Dimensions of these corner pieces were measured from the black and white photo of the wagon and the gauge 1 model by Märklin.
Doors, hold in position with magnets on the inside; next job are the hinges
These are made of 1,5 mm strip, were the end is formed in this simple die. The punch is a 3mm steel pin (the end of a broken tap)
The hinges are only hold by 1 rivet (2 mm) and are (as on the original wagon)
It's beginning to look like a door assembly
Again the shaper was put to use to make the fixed side of the hinge.
cross drilling the 3 mm holes for the hinge pin. Because the shaped profile is long, it's easier to keep it clamped straight in the vice.
And cutting to width is also easier, if the profile has some length.
All 12 hinges in production.
Twelve hinges, with two rounding on top, and two on the ends. Forty eight fillets to be filled; an evening well spent.
The doors fixed to the wagon.
The top catch, made in two separate parts. This way it could be made with the shaping machine.
The top of the locking mechanism.
A extension is silver soldered on the top of the strip.
At the bottom a simple catch is made. To get these catches in the correct position, I've used some superglue to fix them, before drilling.
The door handle, sawed to width and bended in the vice.
In the locked position, the handle is faced downwards.
When moved upwards, two small lifting arms push the strip upwards.
On the inside of the door frame, small wooden strip are glued. The support the doors, so they can not be moved inwards.
The middle catch and locking strip.
The doors almost completed. A door grip is the only thing to be made.
Opening the door.


