
The frame and superstructure are becoming shape.
To determine the correct length of the frame beams, I had to make the door hinges first. With this design of these hinges, there is no way to correct the 'hanging/positioning' of the doors in the door frame. To adjust this there is only one 'parameter'; the length of the frame.
By making the hinges first, it is possible to measure on the job how long the side walls will be overall. This will determine the length of the frame.

The bodies of the hinges are made of 6 mm steel strips....

.....milling....

....drilling and reaming....

....tapping M2....

.....filling round....

assembly on the side walls.

Cutting 1,5 steel plate for the second half of the hinge

Bending the lug with a small jig in the vice.

Closing the lug.

The bent lug.

Scribing the exact position of the lug.

Each lug is made to size to its location on the door.

After that, the lip is made to width.

Riveting to the door.


A small gap between the door and frame is left. This is necessary for the paint layer later on.

One part of the side wall with door.
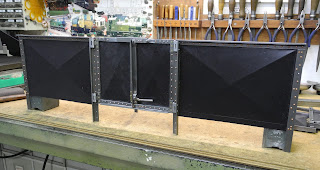
Test setup of the complete side of the wagon.

The exact length of the side wall can be measured and the frame beams can now be made to size.

These hot-rolled profiles (40 x 20 x 5) are not fully straight.
They are adjusted by bending (pressing) them into shape.
They are adjusted by bending (pressing) them into shape.

Drilling the holes for the corner pieces and the horns.

The first assembly of the frame.

The superstructure on the frame.


Brackets that support the vertical beams to the frame. Although they are small and only made of a 1,5 mm plate and fixed to the frame with two M2 bolds, it is surprisingly ridged.

The side walls are fixed to the frame.

A long 10 x 10 x 2 mm support beam for the bottom part of the side wall.
With the NC control of the milling machine, the position of the rivets (interval 11.5 mm) is set out.

A first impression of the wagon.