
One of the last parts for the boiler that had to be made were two girder plates. They are positioned on top of the firebox and will be the connection between the firebox and the outer wrapper.
They are made of 3 mm copper sheet and are relatively easy to make, but need to be made with accurate dimensions and shape as the will take care of the proper position of the inner firebox in relation to the outer wrapper. An aluminum former is therefore made. This simple milling job was set up in the machine vice using a large mantle head mill.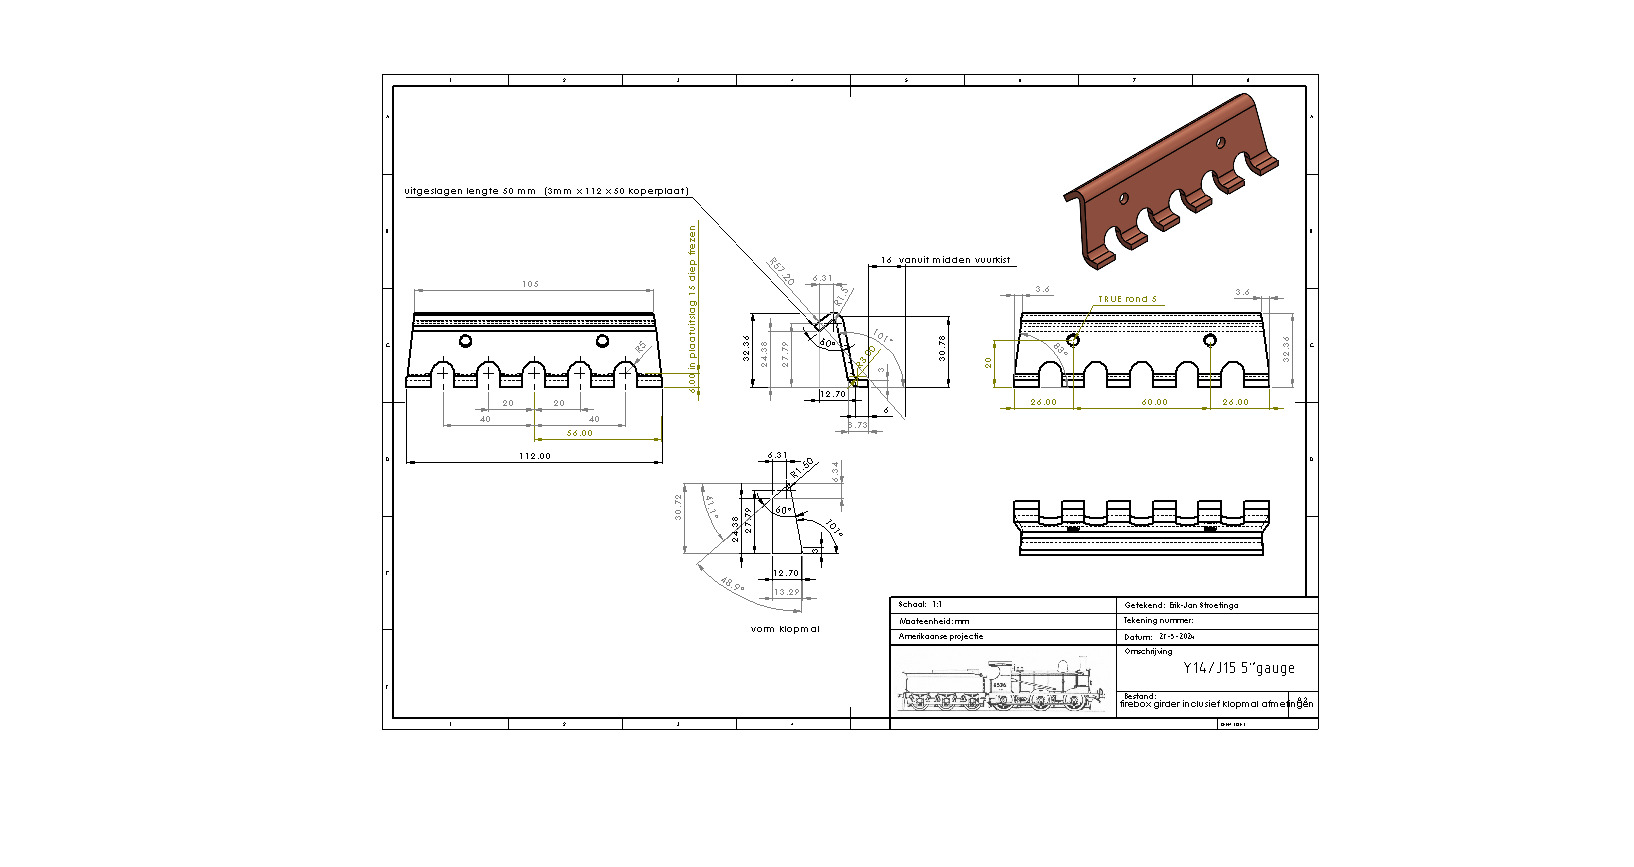
.JPG)
.JPG)
.JPG)
.JPG)
Clamping down the two copper plates, for milling the water spaces.
.JPG)
.JPG)
After annealing, the first bend is made.
.JPG)
Sanding down the lips, so there is a good flat surface and reference face for the next bending operation.
.JPG)
Two pilot holes are drilled, which makes it possible to clamp the girder to the correct height on the aluminum former.
.JPG)
In the vice, the plate is bent, by the use of the hammer.
.JPG)
A second annealing operation is needed, so the sharp corner can be made.
.JPG)
.JPG)
The test set-up shows that the upper lips, closely follow the radius of the outer wrapper.
.JPG)
.JPG)
By placing the two girders to the correct width distance between lips, the height between top of the firebox and the outer wrapper is set. By this boiler it is 43 mm. Designing in Solidworks has the advantage that all these dimensions can be measured in the 3D drawing. The dimensions and shape for the aluminum former block were also be dirived this way.
The inner dome was a straightforward turning job. A hefty piece of bronze bar was needed. And a lot of material is transformed in to chips.
.JPG)
.JPG)
.JPG)
.JPG)
Much was machined and reduced to chips
.JPG)
.JPG)
A filler plug is also made of bronze (M16 x 1) with a hexagonal key width of 20 mm.
This at first wouldn't fit in the dome. The screwthread was too tight. Only after a few turns into the dome and got stuck. It puzzled me for a time why this happened, because the tap and die had cut beautifully, without any difficulty. After measuring I found that the predrilled hole for the thread was 14.9 mm instead of 15mm (as stated in the screwthread table).
After reaming the thread in the dome to 15mm, it fitted perfectly 😀
.JPG)
The large chamfer is needed so that it will fit later on under the outer dome cover.
