Welcome

Live steam model on 7¼" gauge of the Württembergische T3 no 924

Welcome to this blog. It will inform you about the progress of designing and building live steam model locomotives. The blog contains the description of a model Würrtembergische T3 on 7¼" gauge (built between 2006 and 2017), the wagons for this loco (built between 2018 and 2022)  and a 5" gauge model of a Great Eastern Railway Y14 class loco (started in 2020)

On the left you'll find the index where you can browse through the different articles and on the right you'll find all the extra's. On the top tabs you'll find a brief description of my other locos.


Click for the direct link to start of construction series below 
T3 7¼" steam locomotive 
 
Enjoy this site. Erik-Jan Stroetinga. The Netherlands. Europe.


Tuesday 25 April 2017

Painting (3) & assembly

The running gear is now assembled and, as shown in the previous blog, tested on air. The next step is the painting of the 'brass work' (Tanks, coal bunker, cab etc.) 

And if you want to download the latest version of the drawings of this locomotive and the goods wagons go to Grabcad via this Link ; ( Drawings in Solidworks 2016)


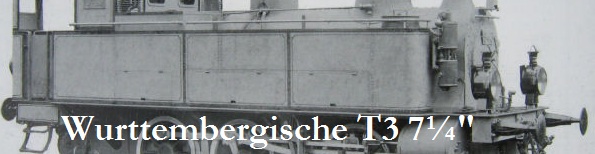
The livery: red, black-grey and black, with the steel rods it looks quite pleasing. 

The smokebox and exhaust are assembled. The baffle plate will stay unpainted and is made of stainless steel.  The blower and its steam supply pipe are also connected. All the screw threads inside the smokebox are greased with copper paste; so hopefully it will be easy to disassemble for maintenance. 

For locking the doors in the water tanks, simple neodymium magnets were bought.  A model engineer friend of mine gave me this tip. He uses this on the toolbox doors of his 5" gauge German P8 class loco. This way the doors can be opened and closed quickly, without any movements of the handles. and I hope it will prevent damage on the paintwork.

A brass block is screwed to the inside of the tank and a 4mm round magnet is pressed in the drilled hole. A set screw on the back allows fine adjustments, so a lock nut on the handle of the door is just touching the magnet, when the door is closed. 

The magnets in position


For painting the brass parts, sandblasting was needed, so the primer will have good adhesion to the surface. 

Because of the rivets, nameplates and window frames using sandpaper was not an option. The professional sand blasting equipment, at the work of my son, worked perfect. 


In one evening, almost all the parts were done. The transport box of my 5" gauge loco was used to safely transport the tanks, cab, doors and other small parts. 

Several parts primed and drying above the heating

Spraying the tanks. The rotating stool came in handy. 

Hardly any difference in colour: sprayed primer and sandblasted brass. The inside of the tanks is not painted. 


The first coat of black-grey paint on the spectacle plate. 


The first impression of the livery.


Sanding down the surface, ready for taking the second coat.

The inside of the cab was also painted; but will get a third coat later; in light yellow or cream. 


The tanks, after three days of drying, assembled on the loco and connected to the balancing pipes.
We filled both tanks with water, to washout any traces of sand blasting grit and other debris that may have entered the tanks. At the same time we've tested all the connections to be watertight.

 Inside the frames the balancing pipes and oil pipes are mounted


A view from the rear to the "front end".


Tanks assembled and cleaned.

The lubricator, easy to be reached via the door. 


Friday 31 March 2017

Completing the running gear

The assembly of the running gear of the loco is now on it's way. Also some parts have to be made, for finishing the locomotive.


Wooden coffee stirrers are used to make a floor in the toolboxes below the cab. With a polyurethane glue, these sticks were glued on some cross members and left to dry. 


After cutting them to size and painting them with varnish they make a nice floor. On the real loco these were used to prevent the tools from rattling in the toolbox, and thus keeping the noise level down during the ride. 

I had some trouble with so called 'fish eyes' in the paint. (small spots appearing in the paint after spraying).  According the book "How (not) to paint a locomotive" it could be water in the air that caused it. Although I had a simple water separator, I bought an extra one and installed it with an extra air hose between the compressor and spray gun . The problem was cured.  

Setting the valves and sealing the cylinder block is not difficult. But it takes up a whole weekend to assemble all these parts.

With a Loctite sealant the steam chest cover is mounted. 

The cylinder covers are painted in RAL 7021; black grey.  This is the colour that will be used for the cab and tanks.  All components are in place for the first tests on compressed air. 

Although a bit stiff in the beginning, it soon started to move freely. 


  A short video of the locomotive running on compressed air. 


The running boards are painted red on the underside and black on the top. By spraying them in this position (outside of course), no masking is needed. 


The connection of steam inlet and exhaust; even on 7¼" gauge there isn't much space for wrenches or hands to assemble these parts.

The water pump is driven by an eccentric on the first axle. The gland nut is sealed with an o-ring. This o-ring is supported with a custom made nylon ring, so that there is just enough compression on the stainless steel pump ram to prevent leakage, without being too stiff and cause too much friction.

The pump assembly.  The back plate makes it possible that this pump can be removed for maintenance, (after disconnecting the feed and delivery pipes) from the loco with only four M3 screws.  

On the top of the right water tank the bypass valve is mounted. Where with British locomotives this is nicely tucked away between the tanks and boiler, the German engineers put this all on top of the tanks and boiler. Maybe not the esthetical for the appearance of the loco, but  it is very easy for maintenance!
The return pipe is seen in the picture, where it enters the tank.

The first fitting of the delivery pipes of the axle pump. 


The running boards, smokebox, mechanical lubricator and oil tank for the axle pump eccentric fitted.


Saturday 25 February 2017

The frame in RAL 3002


A 2K polyurethane paint is used for the second coat. 
With the aid of measure spoons (borrowed from my wife) it is mixed in 3:1 


I tried to spray  with the Badger airbrush and although this worked for the small corners, it was to small for the bigger parts.  The book "How (not) to paint a locomotive" by Christopher Vine gave the answer and I started using a normal spray gun. 


I bought an 0.8 nozzle for my AirGunsa AZ5 and the paint thinned a bit more than 10%  (almost 25%), it went a lot better. 


Before painting the steam cylinders, the were assembled and fitted with sealant (Loctite 5926, is an automotive sealant which I used before with success for my 5" 14xx class loco)
Make sure you clean very well afterwards with cleaning paper you throw away directly afterwards. Otherwise silicone contamination could occur and this does not mix with the paint job.


The smokebox in the final primer coat. Before applying this coat, all the in between spaces were sealed first with Loctite 542 Hydraulic sealant, before assembly. This is a quick and effective way to prevent rust developing between the contact surfaces.


A cake decorating turntable was used to revolve the parts during the spraying.


The first assembly steps.  


Small parts drying above the gas heating.


Coupling and connecting rods make a nice contrast with the red frame and wheels


The valve gear assembly.

Sunday 15 January 2017

The first steps in painting

Almost all the parts of the locomotive are now made and I have started to dismantle it, so I can start painting it.

It will be painted in the colours of Königlich Württembergische Staats-Eisenbahnen.   Dirk Wenzel provides good information about the colour scheme on this German website  of the Württembergische locomotives. The standard book on liveries of German locomotives by Wolfgang Diener:"Anstrich und Bezeichnung von Lokomotiven"  is also a good source for paint schemes.
Alas only black and white photos exist of this loco when it was in service, but the German railways used a  RAL colour code system, which makes it easier to find the correct colour, even after more than 100 years.  My other English locomotives have colours that have names as Brunswick Green, Crimson Lake or Royal Blue: this makes it a lot harder to find the correct colour.
But even with the RAL code system, the colour of  locomotives can be slightly different from one loco to another, due to age and weathering of the paint coat or dirt and oil covering the loco.  Even my 5"gauge GWR 14xx class locomotive looks a bit weathered after 12 years of service.

The frame and wheels will be Carmine red  RAL 3002 (Karminrot), the smoke-box, cylinders,  running-board and roof will be Jet black  RAL 9005 (Tiefschwarz). The cab and tanks will be (typical for the K.W.St.E locomotives) Black grey  RAL 7021 (Schwarzgrau).

As a primer I'm using "Sigmacover 280". This is a 2K epoxy marine primer, used on boats and offshore equipment. This was advised to me by one of our club members, who was a painter in his professional life.  It is a strong primer and has good adhesion properties for steel and brass, is relatively easy to use and can be overcoated with most other paints. I'll use a 2K polyurethane paint , "Nelfadur lakverf 2 DN", for the colour coat.


The first step; completely dismantling the loco and cleaning the parts. 


The sheer number of parts makes it hard to find space in my small workshop to store everything.


A colleague at our school was willing to give me some instructions on how to spraypaint correctly.


The first stage: primer on the main frames. During this primer step, I also spraypainted the body of a 5" gauge goods wagon my son was building.


The beginning of the final assembly of the frame.


A single pack primer is brushed on the back of all the parts before they are bolted to the frame. This way I hope to prevent corrosion between the bolted components.


The first stage of assembly. The bolted components and bolt heads ready for a primer coat. After this the colour coat can then be applied.


The buffer heads were heated with a propane flame and then dipped in used motor oil. This burns the oil on the metal. This is a simple and quick way to prevent corrosion and it gives an authentic black finish.


One of the small jobs that still had to be done: making the lifting hooks on the roof. These hooks are taper turned from 4 mm stainless steel rod and bend into a curve. They are silver soldered on the curved mounting plate.  Afterwards they were cut to size and fixed to the roof with M2 bolts.


The four lifting hooks bolted on the roof.  On the real loco these were used to lift the complete cab, for maintenance purposes.


With a small and simple Badger 250 airbrush primer was applied on the bolted components and bolt heads.


The wheels; applying the masking tape took almost more time then the actual spraying. 


My son's GWR 'Iron Mink'. It is now almost completed.